Blockset described on this wiki is deprecated since 2012.
For Model Based Design (MBD), use the free MPLAB Device Blocks for Simulink, tool from Microchip.
Updated Rapid Control Prototyping (RCP) custom projects are published at: https://lubin.kerhuel.eu.
DsPIC Block/SPI Input Output
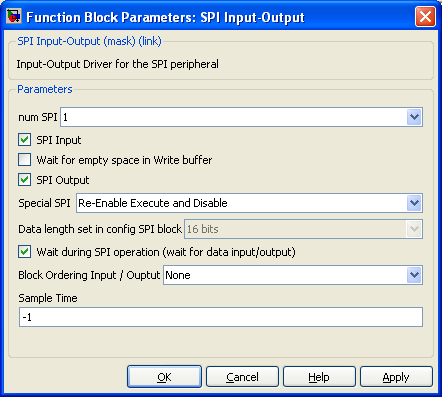
Input-Output Driver for SPI module
The SPI Input-Output block can be configured as an input for SPI data, as an SPI output, or as both Input-Output. The SPI pin can be disabled after reading or sending data allowing the pin tu be used as a digital output (usefull if weird protocole is used)
Contents
Dialog Box Parameters
n° SPI
SPI used
SPI Input
If checked, SPI data will be read This add one output to the Simulink block.
Wait for previous operation to finish, and Reset before Read
Wait for previous operation to finish, and Reset before Read
SPI Output
When checked, SPI data will be written to the SPI pin. This add one input to the Simulink block.
Special SPI
Allow to disable SPI pin function and to use theses pin as digital input/output. The choices are :
- Always Enable
- Disable After block execution
- Re-Enable before block execution
- Re-Enable Execute and disable
Data Length
8 or 16 bits. This option is set in SPI Configuration block
Wait for incomming data (slave mode)
Stop execution of other blocks while no data are received
Block Ordering Input / Output
Create one input and/or output port on simulink. This port is just used to set the order of execution between severals blocks. You want for example inside one time step set a pin to its high value and to its low value just after (create a glitch). You will used two blocks digital output, but they should be activated in a certain order. Connecting the first block to the second one (temporaly speaking) will allow to respect the execution order you desire.
Status
Provides information like bit rate and status
<comments \>


